Advanced git
Table of contents
Tag
Commits can be tagged by the developer, as a way of marking a specific commit. This is useful in preparation for a version release, or simply for marking a particular goal has been reached.
Tags appear on the main code page of a repository.
Useful commands for tagging in git:
List any existing tags within a repository
git tagTag the last commit
git tag v1.0Push a specific tag back to origin (i.e. GitHub, etc.)
git push origin main v1.0Delete a local tag
git tag -d v1.0Delete a remote tag in GitHub
git push --delete origin v1.0Learn more about a specific tag
git show v1.0
Tags can be signed by the developer creating them. They can contain annotations (longer comments), and the author name and date are captured in the git database whenever a tag is created or modified.
Tags can also be incredibly useful when coupled with automations in GitHub Actions. For instance, a test suite or build can be invoked when specific tags occur, instead of with every push or PR.
Stash
git stash is a useful command for setting changes aside while you want to perform another git operation, such as a add, push, pull, etc.
stash allows you to save your in-progress changes, whether they are staged or unstaged, and puts them aside while reverting your working directory back to HEAD.
Git stores stashes in a list that can be reviewed and applied later, if you want to bring those changed files back in.
To see all available stashes:
$ git stash list
stash@{0}: WIP on main: 26393a3 Another commit
stash@{1}: WIP on main: 4d931c4 Testing rebase
If you have only one stash listed, or you want to use the most recent stash (with index 0), you can pull those files/changes back into your branch with
$ git stash pop
If you have more than one stash listed and want to specify which you want to re-incorporate, you need to apply the stash by index (0, 1, 2, …)
$ git stash pop <INDEX>
There are other powerful stash options, such as creating a new branch based on the stash.
Signing commits
Why would I sign a commit?
When working in a team of developers (especially large teams), or when developing code around highly sensitive data or processes, verifying the identity of each collaborator is important. Signing a commit proves authorship, increases trust, assures compliance, and generally boosts confidence in the origin of the code.
You can sign your commits using a gpg or ssh keypair, or a S/MIME signature.
GitHub refers to this as signature verification. Learn more about how to set up sigature verification.
Once set up, you can sign any commit, or set a repo/global configuration to always sign your commits.
git commit -S -m "my commit message"
Developers can also sign pushes in the same way as commits.
Resets and reverting
Sometimes, despite your best efforts, something is committed into your repository that has gone horribly wrong. Perhaps many files are affected, or the stability of your application is in jeopardy. You need to revert your changes and go back one or more versions in git.
Reset - rewinds your history (files and commits) back to a previous commit.
# If you are pulling, rebasing or your new code is a mess, and you want to return to the last committed point:
# Note that this does not delete newly created files
# git clean -f -d will remove newly created files and directories (BEWARE!)
git reset --hard

# reset to the last commit
# HEAD is the current commit, HEAD^ is the last commit
# HEAD~2 is the 3rd, HEAD~3 is the 4th and so on...
git reset --hard HEAD^

# reset to a particular commit
git reset --hard be47384a
Revert - rewinds your files back to the previous commits by adding a new commit to show this. Think of “revert” as exposing this rewind, whereas “reset” does not. Revert “undoes” the action of the commit you revert. Be careful when reverting a commit well in the past.
# Revert the commit 0766c053
# Note that commit may not necessary be the last commit, it can be ANY commit
git revert 0766c053

# Revert the changes specified by the fourth last commit in HEAD and create a new commit with the reverted changes.
git revert HEAD~3

# Revert the changes done by commits from the fifth last commit in master (included) to the third last commit in master (included), but do not create any commit with the reverted changes. The revert only modifies the working tree and the index.
git revert -n main~5..main~2
If you have already pushed your changes, you should use revert since it explains the changes in its history.
Rebase
From GitHub:
The
git rebasecommand allows you to easily change a series of commits, modifying the history of your repository. You can reorder, edit, or squash commits together.
You might rebase to edit previous commit messages, combine commits, and delete/revert unnecessary commits.
Read more about methods and approaches to rebasing.
Note that it is considered bad practice to rebase commits that have already been pushed to a repository. This could create considerable problems for other collaborators.
Squash is an additional command for combining, reordering, simplifying, or rewriting commit histories. It is often used when merging two branches and the developer wants to simplify the tree. Learn more.
Cherry-pick
Cherry picking is choosing a commit from one branch and applying it to another. Similar to merging and rebasing, cherry picking can be done at the individual file level (or at whatever level of changes you want) instead of an entire branch at a time.
Take the example below. A developer has been working on the main branch, while a second developer began a new nav branch. The second developer fixed a bug in the main branch before moving on to other work, and the first developer would like to apply ONLY that bug fix to the main branch.
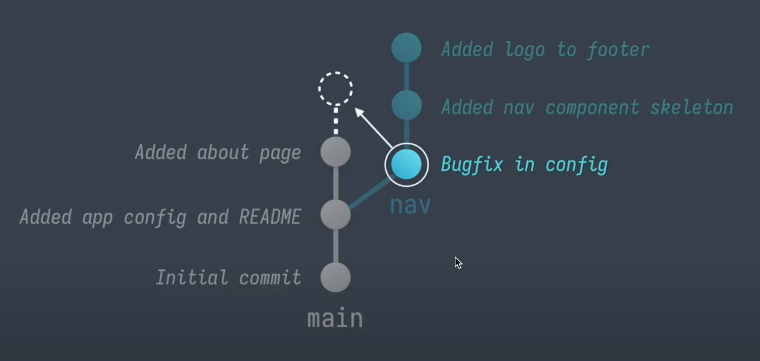
This is an ideal case for using git cherry-pick. When cherry picking you use the hash of any individual commit, available from git log in the branch you want to pick from.
In this case, if you want to cherry-pick from the nav branch:
git log nav --oneline
This will display the log of commits for the nav branch, including the hashes of each commit:
e8a582f (nav) added logo to footer
f3b9124 Added nav component skeleton
4214d55 Bugfix in config
3359d42 Added app config and README
8196bd8 Initial commit
The commit 4214d55 from nav is the one we want to cherry-pick over into the main branch. This requires only one task, which in itself will be a new commit to main. This must be done while in the main branch itself:
git cherry-pick 4214d55
cherry-pick also allows you to pull in more than one commit at a time, if that is useful. The syntax would be:
git cherry-pick 4214d55 e8a582f
Git will then digest these commits into the main branch, in the order in which the command was made. Each of these will then become a new commit in the branch (i.e. two commits in this example).
If there was a conflict when trying to absorb those cherry-picked changes, you will have to sort out the merge conflict.
Rename origin
When working with remote repository connections, the label origin is typically used for the primary remote host, i.e. GitHub, BitBucket, etc. This is used freqeuently with pushes and pulls to connect the local branch to the appropriate destination or source.
$ git push origin main
$ git pull origin main
We also use a remote label like upstream when working with forked repositories and need to fetch changes from upstream.
However, these names can be changed at any point. To see your current remotes, use:
$ git remote -v
origin	    git@github.com:mst3k/some-repo.git (fetch)
origin	    git@github.com:mst3k/some-repo.git (push)
upstream	https://github.com/uvads/some-repo.git (fetch)
upstream	https://github.com/uvads/some-repo.git (push)
Use the built-in command to rename any origin:
$ git remote rename origin destination

$ git remote -v
destination	    git@github.com:mst3k/some-repo.git (fetch)
destination	    git@github.com:mst3k/some-repo.git (push)
Changing from SSH to Token Authentication
If you cloned an existing repository using SSH, you can easily update your local git to use tokens instead. This is also useful if you have refreshed your PAT and need to update that in your repository.
From within the repo, and assuming you already have a PAT and git credential store set up, run this command (inserting your token in the URL):
git remote set-url origin https://github.com/UVADS/git-basics.git
Similarly, if you want to shift from token to SSH authentication, the same command helps with the right URL:
git remote set-url origin git@github.com:UVADS/git-basics.git
These commands update the url value within the .git/config file of your repository.
Bonus - So You Think You Know Git
In this video Scott Chacon, one of the co-founders and original developers of GitHub, talks about buried and advanced features in Git and GitHub.

Topics include:
- Advanced
configoptions - Signing repo commits and pushes using
ssh - Large/Monorepo options
- etc.