Forks, Branches & Merges
Table of contents
Git enables software developers to copy an existing codebase and work with the copy alongside the original, without one interfering with the other.
- The easiest way to copy your entire project code and work with it is called a “Branch”.
- The method for copying someone else’s project in order to work with is called a “Fork”.
- Bringing your changes back into either your project or someone else’s is called a “Merge”. This function is called a “Pull Request” in GitHub.
Branches
The default branch of most repositories is called main. Many developers do their everyday work adding and committing to the main branch. But what if you would like to experiment with a new library, or test out new functionality without disrupting the functionality of the original code? This is what a branch is for.
A branch is a complete copy of your code that can have an independent life from the branch it was copied from.
Creating a branch
To create a new branch (based on a copy of the branch you are currently using)
git branch development
To work with the new branch:
git checkout development
To list all your branches, and indicate which you are currently on (denoted by the *)
$ git branch
  dev
* main
Branches generally end up in one of two possible states:
- The idea / experiment / feature / test that motivated creating the branch in the first place is abandoned and the branch can be deleted. Perhaps the test was unsatisfactory in some way, or impossible to deliver, or otherwise deemed unsuccessful. See how to delete a branch below.
- The new functionality of the branch is considered successful, and you want to fold the new code into the original branch. See merges & pull requests below.
Deleting a branch
To delete a branch:
git branch -d <branch-name>
Forks
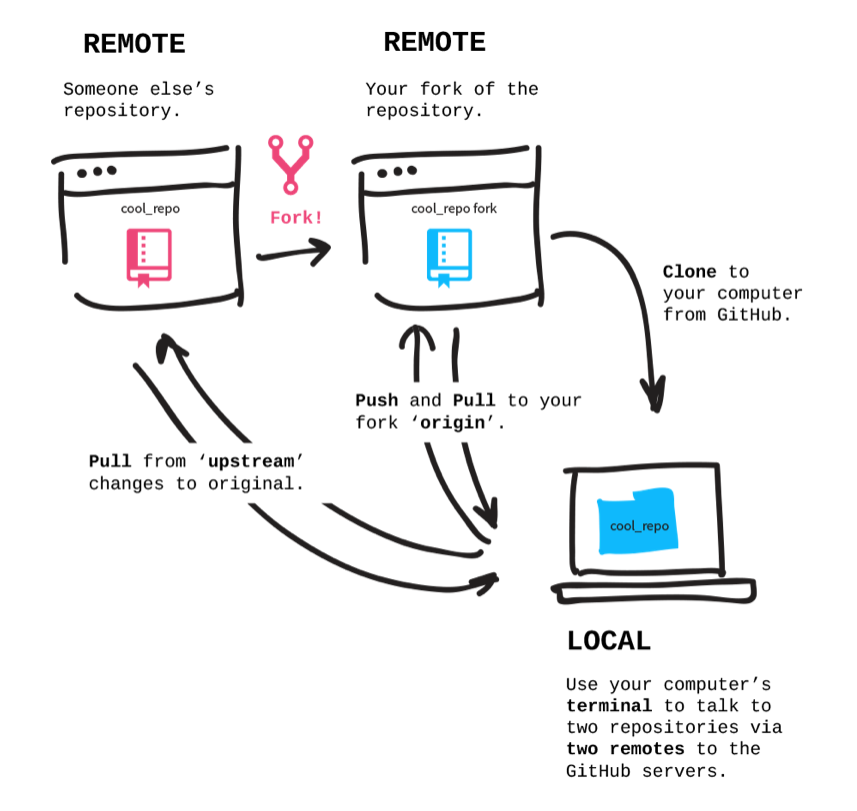
A fork is a copy of someone else’s repository. This is usually because you do not have access to push changes to the repository, or because the organization that controls it requires all changes come through forks and pull requests.
When you fork a repository, a complete copy is made in your own account (or Organization) in GitHub. This gives you complete control to clone and work with the code freely. You own the forked copy, so you can make additions, new functionality, and commit+push to your own fork.
To create and work with a fork of a repository:
- Go to the project’s page in GitHub that you want to fork.
- In the upper-right corner of the page, select the “Fork” button.
- You will be asked where you want the fork to exist, and if you want to rename it.
- Once copied, you can clone the repo to your local computer.
- Make changes, then
git add,git commitandgit pushto your fork.
Upstream
Repositories that are linked with GitHub already have a remote configuration generally called “origin”. This is a reference to the external hosted version of a repository, i.e. the destination when you git push or the source when you git pull.
To see your remote settings for a specific repository, use the verbose output of the git remote command:
$ git remote -v

origin  git@github.com:UVADS/git-basics.git (fetch)
origin  git@github.com:UVADS/git-basics.git (push)
In this example, origin is configured for both pulling and pushing.
To configure an upstream repository for a fork, use this command to add a remote to the original source of the fork:
git remote add upstream https://github.com/OWNER/REPOSITORY.git
This adds two additional remotes to your repository:
$ git remote -v

origin  git@github.com:UVADS/git-basics.git (fetch)
origin  git@github.com:UVADS/git-basics.git (push)
upstream git@github.com:ACCOUNT/git-basics.git (fetch)
upstream git@github.com:ACCOUNT/git-basics.git (push)
To incorporate changes from the upstream repository into your fork, you need to fetch and merge:
git fetch upstream
git merge upstream/main main
The first line pulls in all changes from upstream without merging them. The second line merges the main branch from upstream into the local main branch.
Learn more about naming upstream and downstream remotes
Merges and Pull Requests
Merge
A merge folds all the changes from one branch into another.
For example, imagine a project where you have a stable, working main branch but have added some new functionality to an experimental test branch. Everything works well and now you’d like to bring those new features into the main branch?
To merge such changes:
Make sure all changes from the experimental branch (aka
test) have been added and committed.git checkout test # make some changes ... git add . git commit -m "Tracking changes before merge"Switch to the branch you want to pull changes into:
git checkout mainMerge the changes from the experimental branch into the current branch:
git merge test
Sometimes a developer may be working on a new experimental branch for some time and does not want it to diverge greatly from the main branch where normal fixes and updates occur.
To stay current, he will probably want to merge those changes from main into his development branch:
git checkout main
git pull origin main    # get current
git checkout dev
git merge main          # merge main changes into dev
At this point his code will be in sync with the primary branch. This means the new features and changes he is developing are less likely to conflict when merged back into main. When developers keep a development branch isolated it gets behind, which means merge conflicts will be much more likely.
Pull Requests
Pull Requests, also known as “PRs” are a special collaborative feature for handling merges within GitHub. A PR extends and expands upon the process of a merge:
- It allows for other users to review changes from one source before they are merged into the main project branch.
- It allows for merges to occur from remote forks of the repository, rather than direct branches of the project itself.
- It exposes every specific change, at the code level, for review and comment.
- PRs can perform basic automated reviews of the proposed change to see if they will introduce conflicts.
One of the most common development patterns that use PRs is found in open source software projects. Typically contributors to OSS projects will fork the repository, add and commit their changes to their fork and then submit a Pull Requests with the source project, asking for their changes to be reviewed and folded in.
Pull Requests in GitHub can be greatly automated, with elaborate build and performance testing, checking for specific criteria, linting the code to check for adherence to standards, and so forth. These automations can, ideally, nudge contributors in the right direction and help reduce much of the overhead if a human editor had to review and evaluate the changes manually.
Merge Conflicts, aka “Merge Hell”
So-called “merge hell” is a term used to describe the difficult process of untangling code that has caused issues during the merging of code changes from multiple branches.
This occurs most often when two or more developers have been working on the same file, and possibly on the same segment of code, without frequent adds/commits/pushes back to GitHub. This means that when git tries to merge these various changes into a single block, it cannot decipher what change should get priority.
The way out of a difficult merge conflict is to identify the file(s) affected, and then manually sort out the changes to be kept or discarded.
Example
Imagine two developers work on the same file in separate branches, and add-commit-push their work back to GitHub. No errors would be indicated at this time since the differences in the file exist in separate branches.
But then Developer A tries to merge their colleague’s (Developer B) changed branch into hers:
git checkout devBbranch
git pull origin devBranch
git checkout devAbranch
git merge devBbranch
And then encounter this error, indicating a merge conflict:
Auto-merging participants.txt
CONFLICT (content): Merge conflict in participants.txt
Automatic merge failed; fix conflicts and then commit the result.
The bad news is there is a conflict. The good news is that git reveals the file(s) where the conflicts exist. In this case, the conflict is in the participants.txt file.
To remediate this, open the file and look for the merge markers:
Finance team
-Charles
-Lisa
-John
<<<<<<< HEAD
-Stacy
-Alexander

Marketing team
- Collins
- Linda
- Patricia
- Morgan
- Amanda
=======
-Stacy
-Alexander
>>>>>>> master
Note the <<<<<< and >>>>>> markers, which indicate the beginning and end of the conflicted section. Sometimes you will see more than one section. Each section must be addressed by hand. If multiple files are affected, each must be resolved.
The content between those markers also contains ====== which denotes the break between the two branches - the section above this marker is the destination you are trying to merge into and the section below it is the source branch you are trying to merge in.
To resolve this: Clean up the content between the marge markers, leaving only the content you want. Be sure to remove the markers themselves, i.e. all instances of <<<<, >>>>, and ====.
Then, add and commit the changes back to the desired branch, and push.
Learn More
Try your hand at a merge conflict lab in GitHub.
 Watch: Resolve Git Merge Conflicts: The Definitive Guide
Partial Merges
A “partial merge” could involve pulling in a file or directory from another branch without a full merge or pull request.
Assume you have two branches: One with the file(s) you want (i.e. the source), and another where you want to copy these files (i.e. the destination).
Check out the destination branch.
git checkout <destination-branch>Then pull in the file or directory from the other branch using this syntax:
git checkout <source-branch> -- plugins
Once complete, the copied files are now ready to add, commit, and push.
For example, if the main branch has a file settings.yaml that you want to pull over into the dev branch, you would issue these commands:
git checkout dev
git checkout main -- settings.yaml
git add settings.yaml
git commit -m "Fetched in the settings file"
Practice
Practice the above skills by doing the following:
- Working in a GitHub repository you have cloned to your local machine, create a new branch in the repo.
- Switch to that branch.
- Make some changes/additions to the branch and
add/committhose changes. - Push the new branch to GitHub and verify that you can see it in the GitHub web interface.
- Merge the new branch contents into the
mainbranch. - Switch back to the
mainbranch of your repo, locally. Delete the extra branch you created. - Delete the extra branch within the GitHub web UI.
- BONUS: Fork another project that you do not own. This could be a repo for a Python package, platform, or tool that you work with.
- Clone your fork to your local workstation.
- Explore the code to understand some of its structure.
- Create a new branch within your fork.
- Make some changes/additions, then
git addandgit committhose changes. Push your branch back to your fork in GitHub.